Building a Custom PC: Step-by-Step Guide for First-Time Builders
Learn how to plan, choose parts, assemble, and troubleshoot your first custom PC with clear steps, safety tips, and budget-friendly recommendations.
Planning Your Build
A successful custom PC starts with a clear plan. Define your primary workloads, such as gaming, streaming, video editing, or software development, since these determine where to invest most of your budget. For fast frame rates, the GPU typically takes priority; for heavy multitasking or rendering, focus on the CPU, RAM, and fast storage. Decide on form factor early, weighing ATX, microATX, or Mini ITX for feature set, expansion, and desk space. Consider upgradability by leaving spare RAM slots, additional M.2 positions, or extra drive bays, and pick a power supply with headroom for future parts. Create a shortlist of compatible components and note dimensions like GPU length, cooler height, and case clearance. Think through airflow, cable paths, and where your PC will live to manage thermals and noise. Build a simple timeline, gather resources like manuals, and plan a contingency for troubleshooting. With a thoughtful roadmap, your first build becomes a confident, stepwise project in consumer hardware.
Picking the Right Components
Choosing parts is about balancing performance, reliability, and compatibility. Start with the CPU and motherboard, ensuring the socket and chipset support your needs, from USB ports to PCIe lanes. Match RAM type and speed to platform capabilities, and prioritize two identical sticks for dual-channel performance. For storage, pair a fast NVMe SSD for your system and apps with a larger SATA SSD or HDD for bulk files. Select a GPU that aligns with your resolution and refresh rate goals, and confirm its size fits your case. Choose a PSU with reputable efficiency ratings, ample wattage, and quality protections, preferably modular for easier cable management. Your case should offer good airflow, dust filters, and space for your chosen cooler and cables. Cross-check compatibility using vendor specifications, including QVL lists for memory. Do not overlook essentials like a reliable CPU cooler, additional case fans, and peripherals. A well-curated parts list avoids bottlenecks and ensures smooth assembly.
Preparing Workspace and Tools
A clean, organized workspace reduces mistakes and protects your components. Work on a sturdy table with good lighting and minimize static risks using an anti-static wrist strap or by frequently grounding yourself on an unpainted metal surface. Keep a magnetic screwdriver, zip ties, isopropyl alcohol, microfiber cloths, thermal paste, and a small tray for screws within reach. Open boxes carefully and keep manuals accessible; diagrams clarify headers, standoffs, and mounting patterns. Remove both side panels from the case, inspect preinstalled standoffs, and identify cable channels and tie points. Dry fit large components to visualize clearance for the GPU, cooler, and radiators, and choose fan orientations that establish a coherent airflow path from intake to exhaust. If possible, set aside original packaging for any future RMA needs. Approach the build methodically, laying parts on anti-static bags or the motherboard box. Preparing your environment up front transforms assembly into a relaxed, predictable process.
Assembling the Motherboard
Building on the motherboard outside the case simplifies installation. Begin by seating the CPU: align the small triangle or notch, lower the retention arm, and avoid touching pins or pads. Apply a small, even amount of thermal paste if your cooler lacks pre-applied compound, then mount the CPU cooler with firm, cross-pattern pressure. Install RAM in the recommended slots, typically alternating positions for dual-channel operation; listen for a positive click on both latches. Add an M.2 NVMe SSD, using the correct standoff and, if provided, the heatsink for sustained speed. Connect fans to the correct headers like CPU_FAN and CHA_FAN, and reference the manual for front panel header pinouts to avoid guesswork later. Verify the motherboard standoffs you will need and pre-route the 8-pin EPS cable if your case has tight clearances. This bench stage ensures critical parts are secure, tidy, and ready to drop into the case with minimal handling.
Mounting in the Case
Prepare the case by installing the I O shield if your board uses one and verifying that standoffs match the motherboard holes. Position the PSU with its fan oriented for clean airflow and attach only the modular cables you need, reducing clutter. Lower the motherboard into place, ensuring ports align with the shield, and fasten screws in a diagonal pattern to distribute pressure. Route the 24-pin ATX power, 8-pin EPS, and front I O connectors, including power switch, reset, USB, and audio, before space becomes tight. Keep cables along grommets and channels to preserve unobstructed air paths. Install case fans or a radiator with intake at the front or bottom and exhaust at the rear or top, maintaining a balanced pressure setup. Confirm clearance for the GPU and cooler, and verify that no loose cables can contact fan blades. This deliberate order reduces strain, protects components, and sets the stage for a clean, cool-running build.
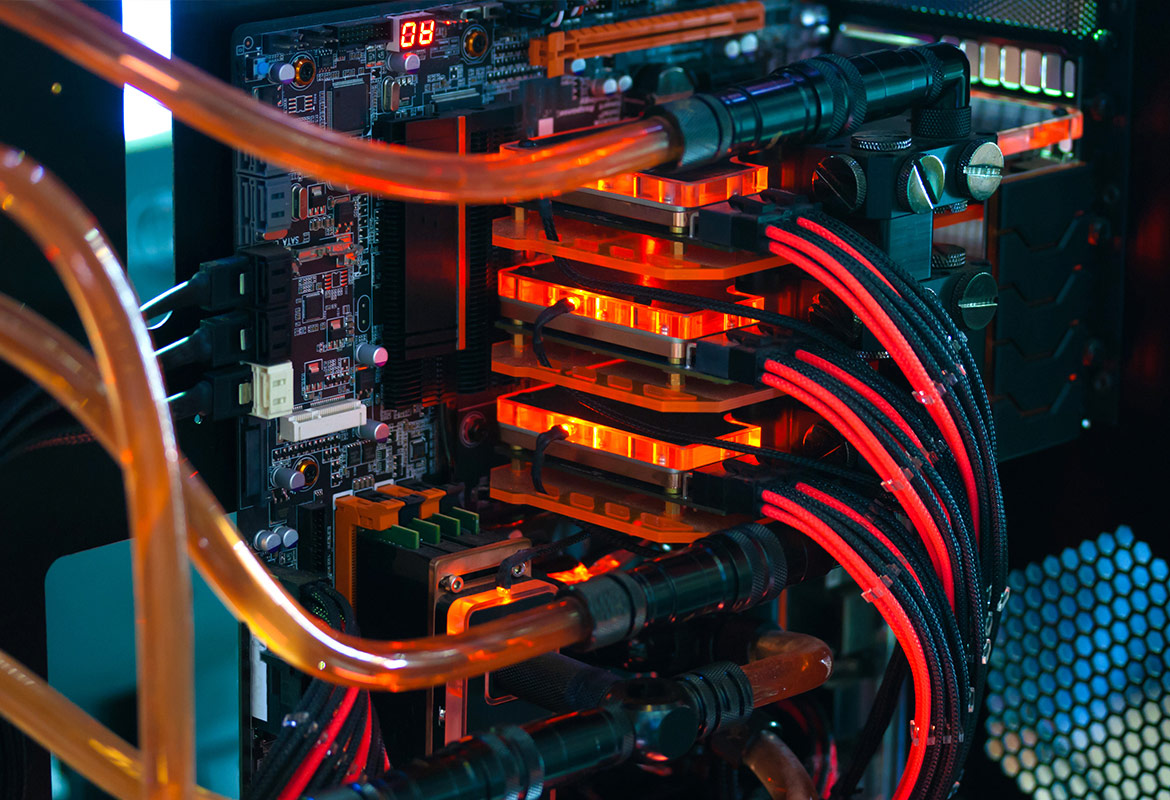
Storage, Graphics, and Cabling
With the board and power in place, mount additional storage and the GPU. Slide 2.5 inch or 3.5 inch drives into brackets or sleds, using tool-less rails where provided, then connect SATA data to the motherboard and SATA power to the PSU harness. Install the GPU in the primary PCIe x16 slot and secure it with case screws or a support bracket to prevent sag. Attach dedicated PCIe power connectors, using separate cables for high-power cards to reduce heat and voltage drop. Tidy the interior by routing cables through cutouts and using tie downs; a clean cable management plan improves airflow, temperatures, and serviceability. Consider fan placement for slightly positive pressure to limit dust ingress, and ensure dust filters are present on intake paths. If using custom fan curves, aim for a quiet baseline that scales smoothly under load. Finishing touches like Velcro straps, short cable runs, and clear labeling make future upgrades fast and frustration free.
First Boot, BIOS, and Optimization
Before the first power on, double check power leads, front panel connectors, and fan plugs. On boot, watch for POST indicators and beeps or LEDs that confirm successful initialization. If there is no display, reseat RAM, GPU, and power cables, and try a single stick of memory. Enter the BIOS to update firmware, enable XMP or EXPO for rated memory speed, set the boot order, and verify temperatures and fan detection. Install the operating system from a USB drive, then load chipset, GPU, and network drivers from manufacturer sources. Run stability tests for the CPU, GPU, and memory, monitoring temperatures with reputable tools. Tune fan curves for a balance of cooling and noise, and check for thermal throttling. Create a backup image once the system is stable. Maintain the PC with dust cleaning, occasional firmware checks, and storage health monitoring. With these steps, your first custom build delivers performance, reliability, and room to grow.